Back to the Microsoft Windows in DOSBox-X
Installing Microsoft Windows 2.x in DOSBox-X
Overview
Editions this applies to
-
Windows/386 2.01 (OEM release)
-
Only meant for early Compaq 386 computers.
-
Introduces 386 extensions (protected mode).
-
LIM EMS 4.0 support.
-
Supplies EMS emulation.
-
Support for overlapping windows.
-
-
Windows 2.03 and Windows/386 2.03
-
Adds support for non-Compaq computers.
-
-
Windows/286 2.10 and Windows/386 2.10
-
Adds HIMEM.SYS support for HMA (High Memory Area).
-
-
Windows/286 2.11 and Windows/386 2.11
-
minor update to memory management.
-
AppleTalk Support.
-
Faster printing and updated printer drivers.
-
Windows 2.x was available in both Retail and OEM editions, for shipping with computers. A special runtime edition was also included with some applications.
Naming
Naming of Windows 2.x editions can be confusing.
-
Editions ending in /286 were marketed for 286 (AT) class computers
-
Editions ending in /386 were marketed for 386 class computers
-
Editions without either designation were primarily meant for 8086/8088 (XT) class computers
However, in reality /286 branded versions can also be used on 8086/8088 systems, as the only 286 specific addition was the bundled HIMEM.SYS driver to allow access to the High Memory Area (HMA) of 286 (or later) systems.
In addition, it can also be used on 386 class systems, although without benefiting from the 386 CPU enhancements.
Likewise, the /386 branded versions can also be used on 8086/8088 or 286 systems, by starting Windows using WIN86.COM instead of WIN386.EXE.
Although without benefiting from the 386 CPU specific enhancements.
Limitations
| Edition | Official Min. CPU | Actual Min. CPU | Min. DOS | HMA driver |
|---|---|---|---|---|
Windows/386 2.01 |
386 |
8086/8088 |
3.10 |
No |
Windows 2.03 |
8086/8088 |
8086/8088 |
2.0 |
No |
Windows/386 2.03 |
386 |
8086/8088 |
3.10 |
No |
Windows/286 2.10 |
286 |
8086/8088 |
3.00 |
Yes |
Windows/386 2.10 |
386 |
8086/8088 |
3.10 |
Yes |
Windows/286 2.11 |
286 |
8086/8088 |
3.00 |
Yes |
Windows/386 2.11 |
386 |
8086/8088 |
3.10 |
Yes |
-
At least 512KB RAM is required
-
Officially requires an HDD
Windows 2.x has problems starting if the reported DOS version is 5.0 or higher. Therefore, it is necessary to set the reported DOS version to something like 4.0.
As Windows/386 2.01 was the first Windows 2.x release and meant only for early Compaq 386 computers, it has a very small selection of drivers, and for instance no driver for a PS/2 mouse.
Therefore, if you want to run this version in DOSBox-X with a mouse, you should either enable serial1=serialmouse support (preferred), or you need to use the PS/2 mouse driver from a slightly newer Windows 2.x release.
Windows 2.1x editions will complain if the High Memory Area (HMA) is used.
This can be resolved by setting DOS=LOW in the [config] section of the DOSBox-X config file, or when booting real DOS by setting the same setting in CONFIG.SYS.
All Windows/386 editions install by default into C:\WIN386 instead of C:\WINDOWS as other Windows versions normally do.
And the command to start Windows/386 is win386.exe, instead of the typical win.com of most other Windows versions at the time.
Windows/386 also has a win86.com executable, which is effectively a renamed win.com, and this makes it possible to run Windows/386 on 8086 and 286 computers.
|
Important
|
Currently DOSBox-X is only able to start Windows 2.x in 8086 compatibility mode from the integrated DOS. To make use of the 386 enhancements, it is necessary to boot real DOS in DOSBox-X. |
DOSBox-X config file
It is recommended that you create a custom DOSBox-X config file for running Windows 2.x
[sdl]
autolock=true

[dosbox]
title=Windows 2.x

[dos]
ver=4.0

[serial]
#uncomment if using Windows/386 2.01 which lacks PS/2 mouse support
#serial1=serialmouse

[parallel]
parallel1=printer

[printer]
multipage=true
timeout=5000

[render]
scaler=none

[config]
dos=low

[autoexec]
Copy the above config and save it as win2x.conf
Method 1 - Installing Windows 2.x into a mounted folder
This method will work for all Windows 2.x versions, but Windows/386 versions can only be run in 8086 compatibility mode.
For running Windows/386 in 386 mode, it is necessary to use method 2 below.
Preparing for installation
The installation will be into a mounted folder, and Windows 2.x will run from the integrated DOS that DOSBox-X provides.
Start by creating a directory on your system that you’re going to use (mount) as your Windows 2.x C: drive. Valid examples:
-
For Windows hosts
-
C:\winroot
-
C:\users\myuser\win2x
-
-
For Linux hosts
-
/home/myuser/winroot
-
/home/myuser/windows/win2x
-
Note: For users using Windows as their host OS, do NOT mount the root of your C: drive as the DOSBox-X C: drive! (e.g., MOUNT C: C:\ should NOT be done)
Windows 2.x versions were shipped on floppies, requiring anywhere between 4 and 10 disks, depending on media-type and Windows version. And while it is possible to install Windows 2.x from floppy images in DOSBox-X, the disk-swap process for this is rather tedious for substantial number of disks. As such it is recommended to make a directory such as "INSTALL" and copy the contents of ALL the diskettes into this directory. This way there is no need to swap disks during the installation process.
Example of extracting files from disk images
There are several ways to extract the contents of disk images, such as 7zip on Windows or "Disk Image Mounter" on Linux. In this example, DOSBox-X itself is used to mount a disk image, copy its contents into a folder, unmount the disk image and do the next.
MOUNT C /home/myuser/winroot
C:
MD INSTALL
IMGMOUNT A DISK01.IMG -U
XCOPY A:\. C:\INSTALL /S /Y
IMGMOUNT A DISK02.IMG -U
XCOPY A:\. C:\INSTALL /S /Y
IMGMOUNT A DISK03.IMG -U
XCOPY A:\. C:\INSTALL /S /Y
IMGMOUNT A DISK04.IMG -U
XCOPY A:\. C:\INSTALL /S /Y
IMGMOUNT A DISK05.IMG -U
XCOPY A:\. C:\INSTALL /S /Y
IMGMOUNT A -U
Your new INSTALL directory now holds the contents of all 5 disks in this example.
Installing in a mounted folder
You’re now ready to start DOSBox-X from the command-line, using the newly created win2x.conf config file.
This assumes that the dosbox-x program is in your path and win2x.conf is in your current directory.
dosbox-x -conf win2x.confYou now need to mount your new folder as the C: drive in DOSBox-X and start the installation.
MOUNT C /home/myuser/winroot
C:
SUBST A C:\INSTALL
CD INSTALL
SETUP
Adjust the path for mounting the C: drive as needed.
|
Note
|
If your path has spaces in it, you need to enclose it in quotes. e.g., MOUNT C: "C:\Users\John Doe\winroot"
|
The Windows installation will now take place. See the Windows 2.x setup program section below.
Method 2 - Installing in real DOS
This method is needed to be able to run Windows/386 editions in 386 mode, and requires that you create a DOS HDD image.
But it brings with it a bit of added inconvenience. For instance, you will need to do your own DOS memory management, and if needed, load DOS drivers for CD-ROM access.
The first step is to create a DOS HDD image, for which you can follow the PC DOS and MS-DOS Installation Guide. It is recommended to use at least DOS 3.1, as it is compatible with all Windows 2.x releases. When using DOS 5.0 or higher however, it will be necessary to use SETVER to make Windows 2.x think you’re using and older DOS version like version 4.0.
Once you have a DOS HDD image, temporarily mount it in DOSBox-X to transfer your INSTALL folder into your DOS HDD image, together with any drivers and add-ons you might need (preferably already unzipped, such that you don’t need to do that in DOS or Windows 2.x, as they lack support for that by default).
Something like:
IMGMOUNT C hdd.img
MOUNT D .
XCOPY D:\INSTALL C:\INSTALL /I /S
XCOPY D:\DRIVERS C:\DRIVERS /I /S
XCOPY D:\ADDONS C:\ADDONS /I /S
EXIT
Adjust paths in the above example as needed.
Now edit your win2x.conf config file and in the [autoexec] section at the end, add the following lines:
IMGMOUNT C hdd.img
BOOT C:
Now start DOSBox-X with your win2x.conf config file from the command-line:
dosbox-x -conf win2x.confIt should boot to the C: prompt, and you can start the installation process.
CD INSTALL
SETUP
After the installation is finished, you can install your drivers and add-ons.
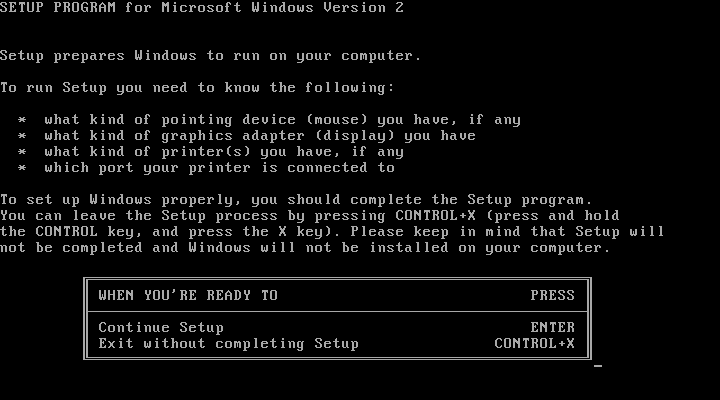
Windows 2.x setup program
The setup program will ask several question relating to mouse, display, keyboard, region and printer.
Note: the below screenshots are from the retail Windows 2.03 release, other releases can vary. In particular, OEM or Runtime versions may have a different number of disks and present other options.
Simply press Enter to continue as prompted.
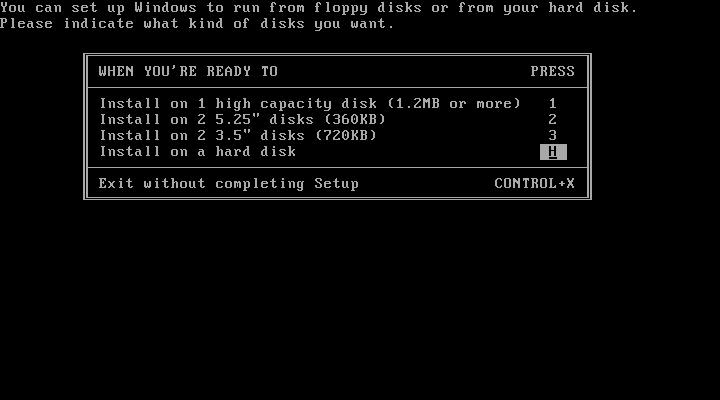
Installation drive
This screen is only shown on Windows 2.03. Later versions require a harddisk.
Confirm you want to install onto the hard disk (H) by pressing Enter.
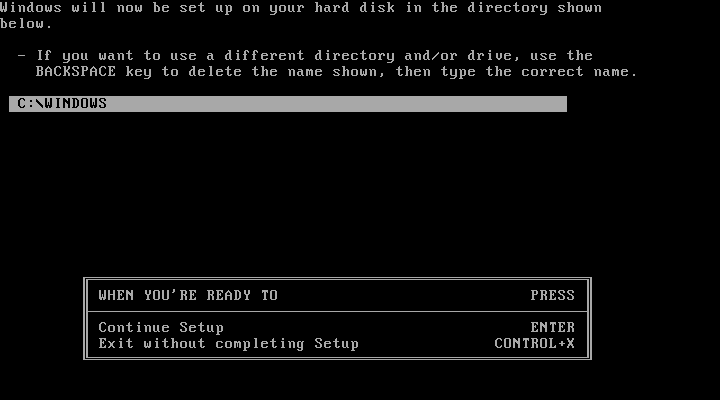
Installation directory
You can optionally specify a different directory to install into.
-
Windows 2.03 and Windows/286 2.1x will propose to install into
C:\WINDOWS. -
Windows/386 2.x will propose to install into
C:\WIN386.
Simply press Enter when ready to use the default.
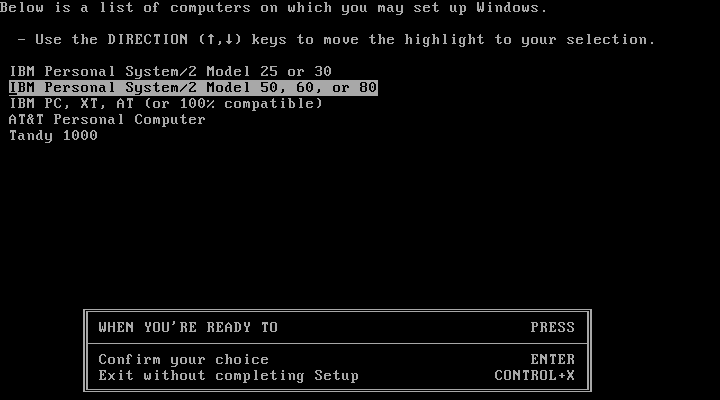
Computer Type
The options offered on this screen will vary depending on the version, and edition (retail, OEM).
-
For Windows 2.03 select the "IBM Personal System/2 Model 50, 60 or 80" option or alternatively "IBM PC, XT, AT (or 100% compatible)".
-
For Windows/286 2.1x select the "IBM Personal System/2 Model 50, 60 or 80" option or alternatively "IBM AT (or 100% compatible)".
-
For Windows/386 2.x select the "IBM Personal System/2 Model 80".
It does not seem to matter which you choose; the only difference appears to be the order that video and mouse options are presented on the following screens.
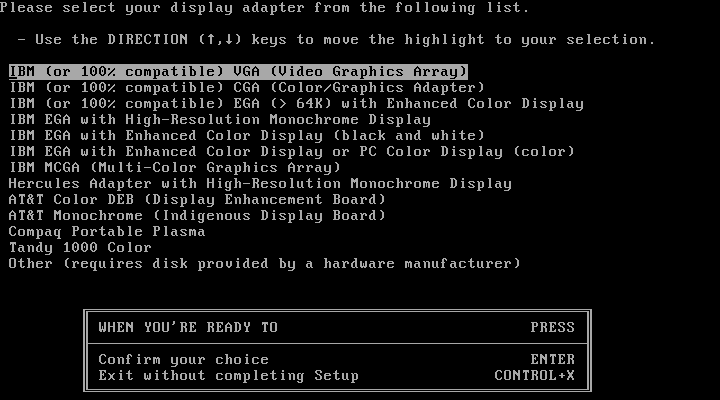
Graphics Adapter selection
Select "IBM (or 100% compatible) VGA (Video Graphics Array)" and press Enter.
Note: depending on the edition, this choice may be labelled slightly differently.
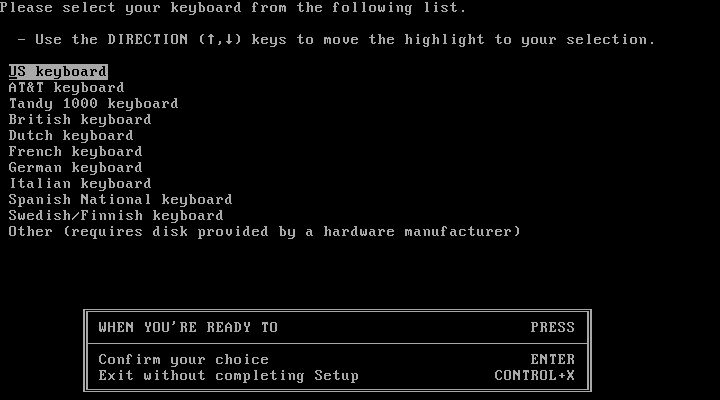
Keyboard selection
Select your desired keyboard layout, and press Enter.
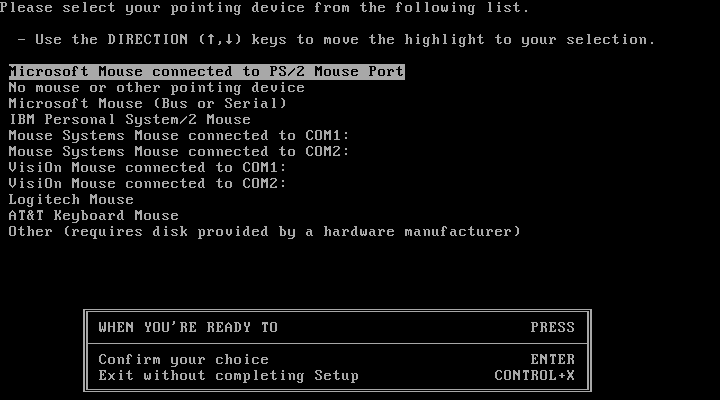
Mouse selection
Select "Microsoft Mouse connected to PS/2 Mouse Port" and press Enter to continue.
|
Note
|
If installing Windows/386 2.01, you will need to select the Microsoft serial mouse instead and activate serial mouse support in your dosbox-x config file. |
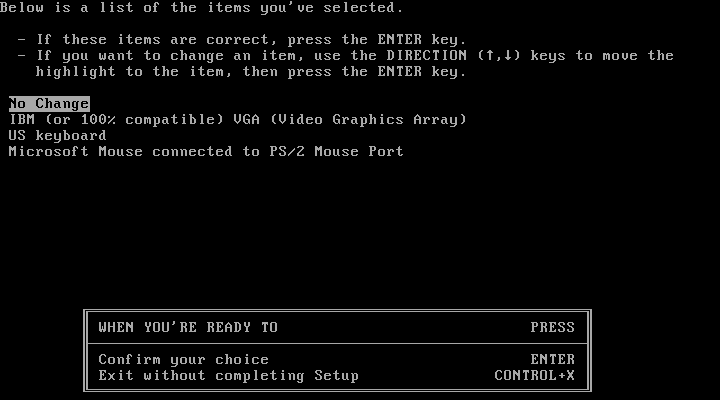
Installation confirmation
Confirm that the settings are correct by selecting "No Change", and pressing Enter, and windows will start the first part of the installation process.
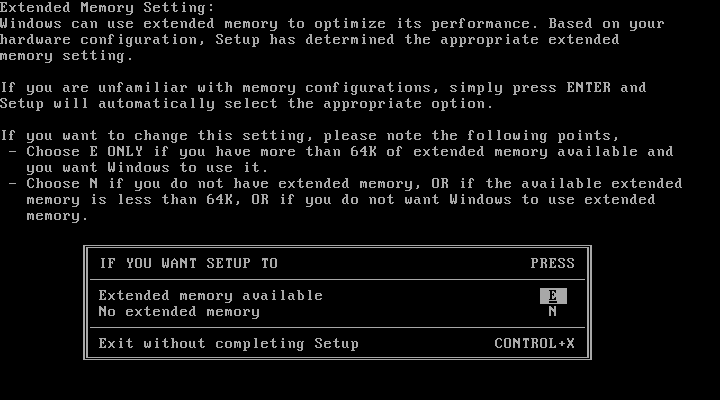
Extended Memory Setting
Starting with Windows 2.10 the following screen will be presented.
Simply confirm by pressing Enter that you want EMS to be available.
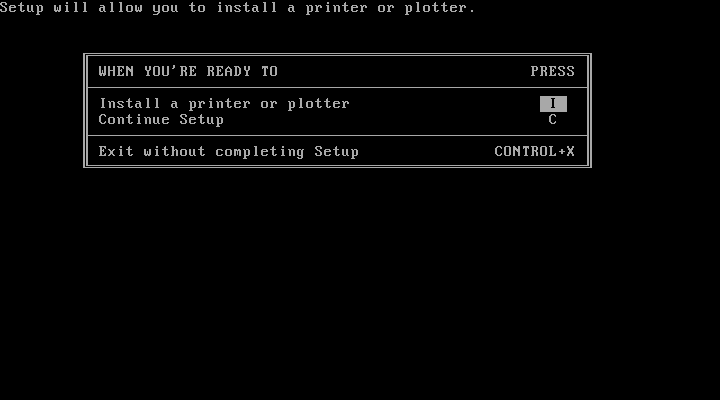
Printer setup
SETUP now asks if you want to set up a printer. You can press enter to confirm, or select Continue Setup to bypass printer setup.
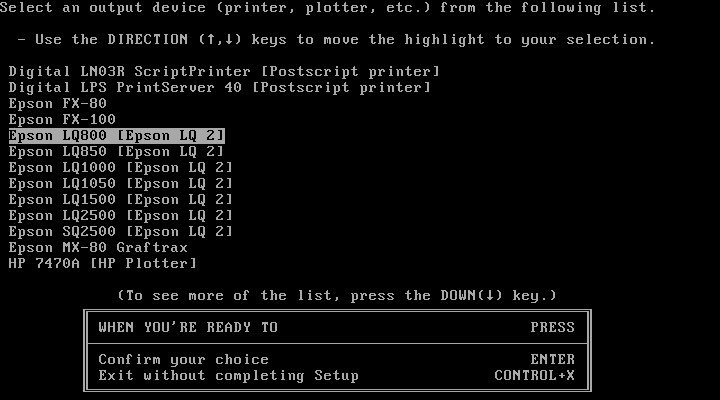
Printer setup - select model
If you indicated wanting to set up a printer, SETUP now asks you which model.
For this guide, scroll to the "Epson LQ-850 [Epson LQ 2]" (or Epson LQ-1050 for wide formats), and press Enter.
Later releases may have more options, such as a "Generic / Text Only" printer which can also be used.
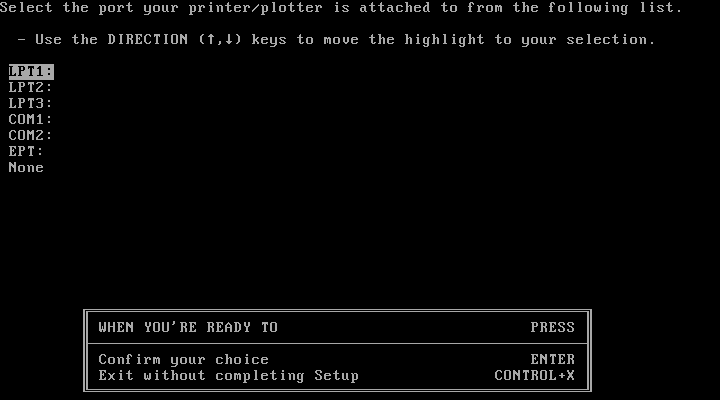
Printer setup - port select
If you indicated wanting to set up a printer, SETUP now asks you which port the printer is connected to.
Select the "LPT1:" port and press Enter.
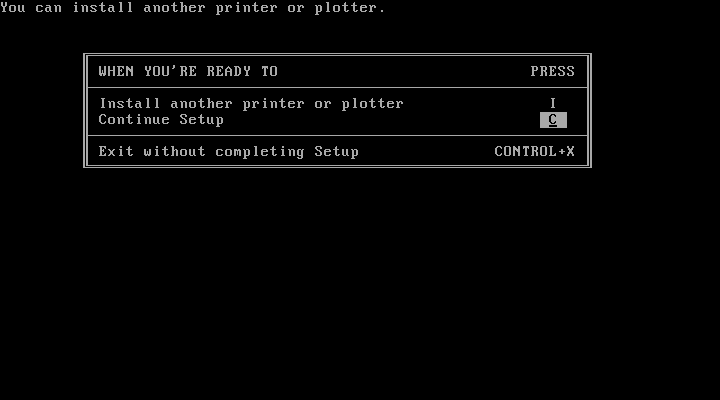
Printer setup - another printer
SETUP now asks if you want to set up another printer.
Select the "Continue Setup" option by pressing Enter to continue without setting up another printer.
You can always change the installed printers afterwards by running CONTROL.EXE from within Windows.
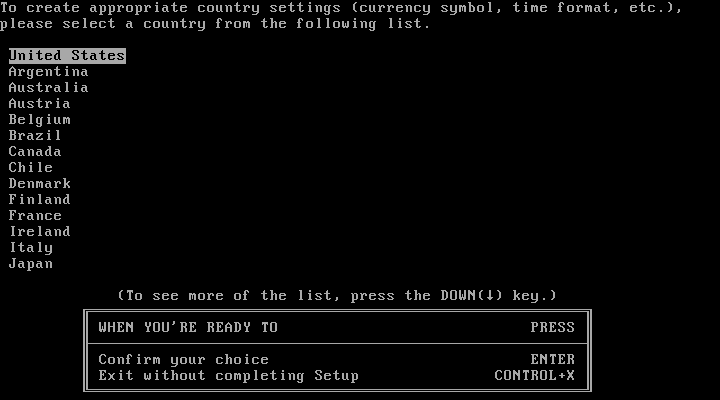
Country selection You will be asked for a country for regional settings.
Select a country from the list, and press Enter.
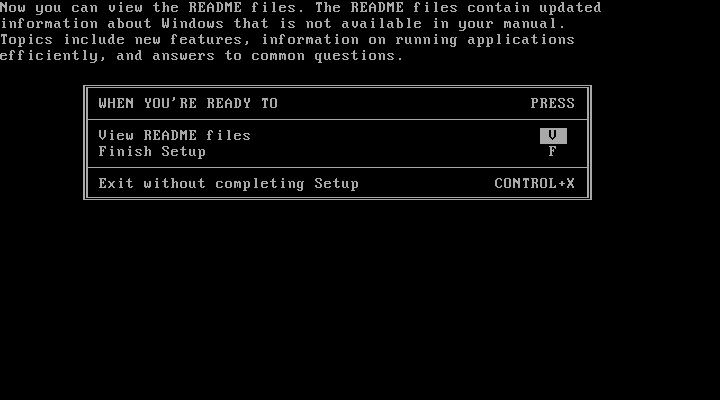
View Readme files
You can now optionally view the README files. Select "F" and press Enter when ready.
-
If you’re following Method 1, you can simply press Enter.
-
If you’re using disk images to install Windows, you must now swap the disk using the menu item "DOS" followed by "Swap floppy". And then press enter.
SETUP completed
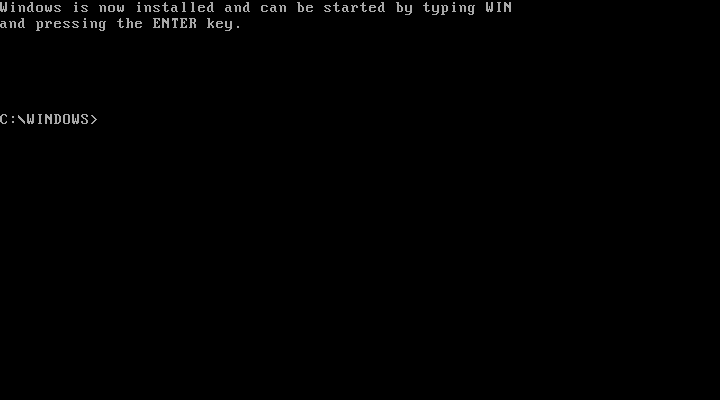
The setup program is now finished, and you’re ready to start Windows 2.x.
But first type EXIT to close DOSBox-X.
And then edit your win2x.conf config file and add the following lines into the [autoexec] section at the end of the file:
@ECHO OFF
MOUNT C /home/myuser/winroot
C:
IF EXIST C:\WINDOWS\WIN.COM     GOTO WINDOWS
IF EXIST C:\WIN386\HIMEM.SYS    GOTO WIN386
IF EXIST C:\WIN386\CVTPAINT.EXE GOTO WIN386
IF EXIST C:\WIN386\WIN86.COM    GOTO WIN386.201
ECHO No Windows installation found
GOTO END

:WINDOWS
ECHO Starting Windows 2.x
SET PATH=%PATH%;C:\WINDOWS;
C:\WINDOWS\WIN.COM
GOTO END

:WIN386.201
ECHO Starting Windows/386 2.01 in 8086 mode with serial mouse
CONFIG -SET SERIAL SERIAL1=mouse
SET PATH=%PATH%;C:\WIN386
C:\WIN386\WIN86.COM
GOTO END

:WIN386
ECHO Starting Windows/386 2.x in 8086 mode with PS/2 mouse
SET PATH=%PATH%;C:\WIN386
C:\WIN386\WIN86.COM
GOTO END

:END
EXIT
Adjust the path for mounting the C: drive as needed.
If you don’t want DOSBox-X to close when exiting Windows 2.x, remove the EXIT command.
Starting Windows 2.x after installation
After the installation is finished, you can start Windows 2.x from the command-prompt with the below command:
|
Note
|
You can optionally create a shortcut on your desktop to start Windows 2.x directly. |
dosbox-x -conf win2x.conf
Video
By default, the best possible video option for Windows 2.x is VGA 640x480 in 16 colours.
While there are no Windows 2.x drivers for any of SVGA adapters that DOSBox-X emulates, there is a [patch available](http://www.seasip.info/DOS/Win1/win2vesa.html) that can convert the Windows 2.x VGA or EGA driver to VESA 800x600 in 16 colours.
Mouse
Windows 2.x does not use the DOS mouse driver that DOSBox-X provides.
Instead it uses its own mouse driver, which must be selected during Windows SETUP.
This has the effect that by default you will need to click in the DOSBox-X window to lock the mouse to the window area.
There is however experimental support in DOSBox-X for such seamless integration. To get this working take the following steps:
Go to doslib releases and download the latest binary release of doslib.
Unpack the archive, and you will find a Windows 2.0 mouse driver in the windrv/dosboxpi/bin/win20 directory.
-
Copy the
DBOXMPI.DRVandOEMSETUP.INFfiles to a place where the WindowsSETUP.EXEprogram will be able to find it -
When you run
SETUP.EXEand get to the mouse selection, select the "Other (requires disk provided by a hardware manufacturer)" option -
Enter the path where you saved the
DBOXMPI.DRVandOEMSETUP.INFfiles -
Select the "DOSBox-X Mouse Pointer Integration driver for Windows 2.0"
-
Continue the setup as normal
In addition, set the following options in your DOSBox-X config file:
[sdl]
mouse emulation=integration

[cpu]
integration device=true
Now when you run Windows 2.0, you should have seamless mouse support.
|
Note
|
These old windows versions had no support for mice with scroll wheels. By default, DOSBox-X will simulate cursor up/down keypresses when you use the scroll wheel.
This can be controlled by the mouse_wheel_key= setting in the [sdl] section of your DOSBox-X config file.
|
Known issues
Running Windows 2.x SETUP
Some versions of SETUP seems to have a bug, where even if all installation files are on the HDD in a folder (e.g., C:\INSTALL), the installation will fail to find the files from for instance, the "Microsoft Windows Write and VM-Control Disk", and will ask for the disk to be inserted. The work-around here is to use something like SUBST A C:\INSTALL to make the installation directory contents available on the A: drive.
Running Windows 2.x from DOSBox-X
-
Windows/386 2.x versions can only be run in 8086 mode. This means launching Windows using
win86.com. Trying to usewin386.exewill result in an "Error: Unsupported DOS version" message. -
Windows 2.1x versions support HMA, but this does not work by default as the HMA area is already in use. Add the setting
DOS=LOWto the[config]section of the DOSBox-X configuration file.
These issues can be resolved by booting real DOS in DOSBox Staging.
Running Windows 2.x from real DOS
-
Windows 2.x will refuse to run from DOS 5.0 or later. When using such a DOS version, it is necessary to load
SETVERto allow Windows 2.x to run. -
Windows 2.1x versions support HMA, but when using DOS 5.0 or later with the HIMEM.SYS driver from DOS, the HMA area is already in use. To allow Windows 2.1x to use the HMA, add the setting
DOS=LOWto config.sys.