Back to the Microsoft Windows in DOSBox-X
Installing Microsoft Windows 3.0 in DOSBox-X
- Installing Microsoft Windows 3.0 in DOSBox-X
- Overview
- DOSBox-X config file
- Preparing for installation
- Installing in a mounted folder
- Booting from a DOS HDD image
- Starting Windows 3.0 after installation
- Steps to take after installation
- Video driver
- Mouse support
- DOSBox-X mouse integration driver
- Sound
- Multimedia Edition Sound
- Enabling printing
- Starting a Windows game from DOS
- Known limitations
Overview
This guide will give a general description of installing Windows 3.0 in DOSBox-X, in addition to addressing some common issues.
Editions this applies to
-
Windows 3.0 (released May 22, 1990)
-
Supports up to 16MB RAM.
-
Improved UI.
-
Improved memory management (286+ only).
-
-
Windows 3.0a (released Dec, 1990)
-
Allow programs to call into real-mode when started in standard mode.
-
Bug fixes for the installer to alleviate crashes.
-
-
Windows 3.0a with Multimedia Extensions (released Oct, 1991)
-
Adds Multimedia Extensions 1.0.
-
Multimedia extensions do not support real mode (8086/8088 CPUs).
-
Adds support for recording and playing digital audio files.
-
Adds support for MIDI devices.
-
Adds support for screensavers.
-
Adds support for analogue joysticks.
-
Adds support for audio CD-ROMs.
-
| Edition | Min CPU | Min RAM | Max RAM | Min HDD space | Min DOS |
|---|---|---|---|---|---|
3.0 |
8086 |
1MB |
16MB |
8MB |
3.1 |
3.0a |
8086 |
1MB |
16MB |
8MB |
3.1 |
3.0a Multimedia Edition |
286 |
2MB |
16MB |
30MB |
3.1 |
Windows 3.0 was available in both Retail and OEM editions, except for Windows 3.0a with Multimedia Extensions which was available only through OEMs.
OEM editions may include and default to different drivers in SETUP for things like video and sound.
README.1ST
There are already some guides to installing Windows 3.0 in DOSBox, and those guides will also work with DOSBox-X. Some examples:
-
Windows 3x on DOSBox guide on sierrahelp.com
This guide does not look to replicate those guides. Instead, this guide will have some install guidance and hints and tips not covered on those pages, or that are specific to DOSBox-X. It is not intended to be a comprehensive guide.
Useful links
General Notes
-
Some parts of the installation can take a considerable amount of time. You may be able to speed this up considerably (depending on the host CPU) by using the DOSBox-X Turbo mode, which can be enabled from the drop-down menu bar by selecting "CPU" followed by "Turbo (Fast Forward)". This turbo mode is not like the old Turbo button on retro PCs, but functions more like a fast-forward, and therefore should not be used when interacting with the guest OS. The turbo mode is automatically disabled the moment a key is pressed, to prevent spurious keypresses to be registered causing undesirable effects.
-
Unless noted otherwise, Windows 3.1 drivers are not backward compatible with Windows 3.0.
Windows 3.0a with Multimedia Extensions specific notes
Also called Windows 3.0 Multimedia Edition
-
This edition was available only to OEMs (Original Equipment Manufacturers) for bundling with a multimedia PC or multimedia upgrade set, as such Windows will be customized to that multimedia system or upgrade set. Examples of such customization, are an OEM specific launcher, OEM specific applications, but also that the installer may default to custom audio and video options.
-
It seems all versions were distributed on CD, the installation can be started by going into the
MWINdirectory on the CD and runningSETUP.EXE. -
Unlike regular Windows which installs by default to
C:\WINDOWSthis edition installs by default toC:\MWINDOWS. -
The two editions which have been archived, shipped with Multimedia upgrade kits, are from Tandy and Creative Labs respectively.
-
The Tandy edition shipped as part of a Sound and CD-ROM upgrade kit, included a "Tandy Sound Blaster Pro 16". Despite the name, this is not actually a SB16, but rather a modified SB Pro (aka SB Pro 1.0). Drivers for this are included with the Windows installation and you should emulate a SB Pro 1 for the best experience. The card by default was set to IO 220, IRQ 10 and DMA 3, and you should either use those settings in your DOSBox-X config file, or modify
C:\MWINDOWS\SYSTEM.INIafter installation. -
The Creative Labs edition shipped as part of a Sound and CD-ROM upgrade kit, included a "Sound Blaster Pro" (aka SB Pro 1.0). Drivers for this are included with the Windows installation, and you should emulate an SB Pro 1 for the best experience.
-
During Windows setup, change the default "Palettized VGA 640x480 with 16 colors" display option to "VGA", or audio playback will cause Windows to crash. You can install the ET4000 drivers afterwards.
-
If during Windows setup you are asked to provide the path to "mouse.sys", skip it. It is looking for the Microsoft DOS Mouse driver, which is not needed.
DOSBox-X config file
It is recommended that you create a custom DOSBox-X config file for running Windows 3.0
[sdl]
autolock=true

[dosbox]
title=Windows 3.0
memsize=16
machine=svga_et4000

[dos]
hard drive data rate limit=0
floppy drive data rate limit=0

[cpu]
cputype=pentium
core=normal

[sblaster]
sbtype=sbpro1

[pci]
voodoo=false

[ide, primary]
int13fakeio=true
int13fakev86io=false

[render]
scaler=none

[autoexec]
Copy the above config and save it as win30.conf
Preparing for installation
Except for the Multimedia Edition, all Windows 3.0 versions were shipped on floppies, requiring anywhere between 5 and 15 disks, depending on media-type and Windows version. And while it is possible to install Windows 3.0 from floppy images in DOSBox-X, the disk-swap process for this is rather tedious for substantial number of disks. As such it is recommended to make a directory such as "INSTALL" and copy the contents of ALL the diskettes into this directory. This way there is no need to swap disks during the installation process.
Example of extracting files from disk images
There are several ways to extract the contents of disk images, such as 7zip on Windows or "Disk Image Mounter" on Linux. In this example, DOSBox-X itself is used to mount a disk image, copy its contents into a folder, unmount the disk image and do the next.
MOUNT C /home/myuser/winroot
C:
MD INSTALL
IMGMOUNT A DISK01.IMG -U
COPY A:\*.* C:\INSTALL
IMGMOUNT A DISK02.IMG -U
COPY A:\*.* C:\INSTALL
IMGMOUNT A DISK03.IMG -U
COPY A:\*.* C:\INSTALL
IMGMOUNT A DISK04.IMG -U
COPY A:\*.* C:\INSTALL
IMGMOUNT A DISK05.IMG -U
COPY A:\*.* C:\INSTALL
IMGMOUNT A -U
Your new INSTALL directory now holds the contents of all 5 disks in this example.
Mounting an installation CD-ROM
If you have a "Windows 3.0a Multimedia Edition" CD-ROM image, you can simply mount it in DOSBox-X, and run the SETUP program. e.g.,
IMGMOUNT D win30me.iso
D:
CD MWIN
SETUP.EXE
The installer is normally found on the CD as \MWIN\SETUP.EXE.
Installing in a mounted folder
Create a directory on your system that you’re going to use (mount) as your Windows 3.0 C: drive. Valid examples:
-
For Windows hosts
-
C:\winroot
-
C:\users\myuser\win30
-
-
For Linux hosts
-
/home/myuser/winroot
-
/home/myuser/windows/win30
-
|
Note
|
For users running Windows natively on their computer, do NOT mount the root of your C: drive as the DOSBox C: drive! (e.g., MOUNT C: C:\ should NOT be done), as it will cause confusion and potential conflicts between the host system C:\WINDOWS directory and that of Windows 3.0.
|
Now create a directory underneath that, which will hold your Windows 3.0 installation files.
e.g., C:\users\myuser\win30\INSTALL or /home/myuser/winroot/INSTALL and copy the installation files into it.
You are now ready to start DOSBox-X from the command-line, using the newly created win30.conf.
This assumes that the dosbox-x program is in your path and win30.conf is in your current directory.
dosbox-x -conf win30.confYou now need to mount your new folder as the C: drive in DOSBox-X and start the installation.
MOUNT C /home/myuser/winroot
C:
CD INSTALL
SETUP
Adjust the path for mounting the C: drive as needed.
|
Note
|
If your path has spaces in it, you need to enclose it in quotes. e.g., MOUNT C "C:\Users\John Doe\winroot"
|
The Windows installation will now take place.
Once the installation process has finished, you will be asked if you want to start windows or exit to DOS. Exit to DOS and type EXIT to close DOSBox-X.
Now edit your win30.conf config file and add the following lines into the [autoexec] section at the end of the file.
@ECHO OFF
MOUNT C /home/myuser/winroot
C:
IF EXIST C:\MWINDOWS\WIN.COM GOTO MWINDOWS
IF EXIST C:\WINDOWS\WIN.COM GOTO WINDOWS
ECHO No Windows installation found
GOTO END

:MWINDOWS
echo Starting Windows 3.0a with Multimedia Extensions
SET PATH=%PATH%;C:\MWINDOWS;
SET TEMP=C:\MWINDOWS\TEMP
C:\MWINDOWS\WIN.COM
GOTO END

:WINDOWS
echo Starting Windows 3.0
SET PATH=%PATH%;C:\WINDOWS;
SET TEMP=C:\WINDOWS\TEMP
C:\WINDOWS\WIN.COM
GOTO END

:END
EXIT
Adjust the MOUNT path above for mounting the C: drive as needed.
Booting from a DOS HDD image
This method brings with it a bit of added inconvenience. For instance, you will need to do your own DOS memory management and load DOS drivers for CD-ROM access. You can also not boot DOSBox-X from a mounted host directory (folder mount).
Host Folder mounts
Starting with DOSBox-X 2022.08.0, there is optional support to dynamically convert a host folder mount to an emulated FAT harddisk for use when you need to boot a guest OS, such as MS-DOS.
This can be accomplished in one of two ways. Either when you issue the boot command, you add the option -convertfat. e.g. boot c: -convertfat.
Or by setting the following option in your DOSBox-X config file:
[sdl]
convertdrivefat = true
When you now boot from a real image file, it will attempt to convert ALL folder mounts at the time of booting to emulated FAT Harddisks.
|
Note
|
You cannot boot from such an emulated FAT harddisk. You will still need some other bootable image file to actually boot a guest OS. |
|
Note
|
This conversion is dynamic, effectively creating an emulated FAT harddisk out of a folder mount.
This converted FAT harddisk is not automatically stored permanently.
You can however, store it as a permanent image file that you can later mount with IMGMOUNT, using the "Drive" > "drive letter" > "Save to disk image" option from the menus.
Please see the "Creating harddisk images from folder mounts" section in the Guide: Managing image files in DOSBox-X for more information.
|
|
Note
|
There is currently no support for creating emulated CD-ROM or Floppy drives out of folder mounts with this method. Any CD-ROM or Floppy folder mounts will also be converted to harddisk folder mounts, and may not actually work for the intended purpose. |
One thing to note, is that there is no way to specify the FAT type to use for the conversion.
The FAT type will be automatically selected based on the aggregate size of files in the folder, plus 250MiB (this can be adjusted with the convert fat free space option in the DOSBox-X config file).
If the total space of files + 250MiB does not exceed 2GiB, it will convert it into a FAT16 disk. Otherwise, it will become a FAT32, which in turn will require a guest OS with FAT32 support.
Alternatively, you can also make the emulated FAT drive read-only by using the -convertfatro option with the boot command. Or by setting convert fat free space=0 option in the DOSBox-X config file.
Installing Windows 3.0 into a DOS HDD image
The first step is to create a DOS HDD image, for which you can follow the PC DOS and MS-DOS Installation Guide. You need at least DOS 3.1 for Windows 3.0. However, it is recommended to use a newer version such as DOS 6.x
Once you have a DOS HDD image, temporarily mount it in DOSBox-X to transfer your INSTALL folder into your DOS HDD image, together with any drivers and add-ons you might need (preferably already unzipped, such that you don’t need to do that in DOS or Windows 3.0, as they lack support for that by default).
Something like:
IMGMOUNT C hdd.img
MOUNT D .
XCOPY D:\INSTALL C:\INSTALL /I /S
XCOPY D:\DRIVERS C:\DRIVERS /I /S
XCOPY D:\ADDONS C:\ADDONS /I /S
EXIT
Adjust paths in the above example as needed.
Now edit your win30.conf config file and in the [autoexec] section at the end, add the following lines:
IMGMOUNT C hdd.img
BOOT C:
Now start DOSBox-X with your win30.conf config file from the command-line:
dosbox-x -conf win30.confIt should boot to the C: prompt, and you can start the installation process.
CD INSTALL
SETUP
After the installation is finished, you can install your drivers and add-ons.
Starting Windows 3.0 after installation
After the installation is finished, you can start Windows 3.0 from the command-prompt with the following command:
dosbox-x -conf win30.confYou can optionally create a shortcut on your desktop to start Windows 3.0 directly.
Steps to take after installation
Once Windows 3.0 is installed, here is some additional software you may want to install or update:
-
Updated Video drivers
-
Adobe Type Manager 2.5
Video driver
See Video card support in DOSBox‐X for more information about the various video cards, and available options.
|
Tip
|
For Windows 3.0 the recommended display adapter is the Tseng Labs ET4000. |
Here are the recommended drivers, depending on the video adapter you are emulating.
-
Tseng Labs
-
ET3000 using
machine=svga_et3000 -
ET4000 using
machine=svga_et4000
-
-
Paradise Systems
-
PVGA1A using
machine=svga_paradise
-
Mouse support
When running Windows in DOSBox-X the integration is not seamless. You need to capture the mouse and again release it when you want the mouse to leave the DOSBox-X window. This is because Windows uses its own driver instead of using the integrated mouse support that DOSBox-X provides.
There are two possible solutions to this.
DOSBox-X mouse integration driver
There is experimental support in DOSBox-X for seamless integration. To get this working take the following steps:
Go to doslib releases and download the latest binary release of doslib.
Unpack the archive, and you will find a Windows 3.0 mouse driver in the windrv/dosboxpi/bin/win30 directory.
-
Copy the
DBOXMPI.DRVandOEMSETUP.INFfiles for your Windows version to a place where the Windows SETUP.EXE program will be able to find it -
When you run SETUP.EXE, select to change the mouse and then select the "Other (requires disk provided by a hardware manufacturer)" option
-
Enter the path where you saved the
DBOXMPI.DRVandOEMSETUP.INFfiles -
Select the "DOSBox-X Mouse Pointer Integration" option
-
If SETUP asks for the "DOSBox-X Guest Additions" disk, give it the same path as before.
-
Continue the setup as normal
In addition, set the following options in your DOSBox-X config file:
[sdl]
mouse emulation=integration

[cpu]
integration device=true
Now when you run Windows 3.0, you should have seamless mouse support.
|
Note
|
These old windows versions had no support for mice with scroll wheels. By default, DOSBox-X will simulate cursor up/down keypresses when you use the scroll wheel.
This can be controlled by the mouse_wheel_key= setting in the [sdl] section of your DOSBox-X config file.
|
VMWare mouse driver
DOSBox-X also supports the VMware mouse protocol. There is a 3rd party Windows 3.0 mouse driver VBMOUSE.DRV by @javispedro, including support for the scroll wheel.
If you are running Windows 3.0 directly in the DOSBox-X integrated DOS environment, do not load the VBMOUSE.EXE driver. Only install the VBMOUSE.DRV in Windows 3.0.
For scroll wheel support, you will also have to set the following setting in your DOSBox-X config file:
[sdl]
mouse_wheel_key=0
Sound
Windows 3.0 and 3.0a does not really support sound. It only supports the PC Speaker, and even then is limited to a simple "beep" sound.
Some early Windows games will directly access the PC Speaker, without a driver, to get more complex sounds.
In addition, it is possible to install early versions of Sound Blaster software for Windows, which provides its own API, to allow the included Jukebox and Mixer to access the hardware.
Multimedia Edition Sound
As mentioned, this Windows edition was only available as part of a Multimedia PC purchase, or Multimedia upgrade kit.
Very few Windows games support this edition. Look for a combination of Windows 3.0 and the "Multimedia Windows" or "Windows MPC" logo on the box. A few known titles to support it:
-
Early Sierra Online Windows versions such as: Mixed Up Mother Goose, King’s Quest V, Space Quest IV, Laura Bow 2, King’s Quest VI, Freddy Pharkas, EcoQuest 1
-
Battle Chess Enhanced CD-ROM
The only available sound drivers, are the once included with the installation. Later Windows 3.1 sound drivers will not work.
There are two editions for which information is available:
-
Tandy Multimedia upgrade kit with "Tandy Sound Blaster Pro 16", which is actually a modified SB Pro 1.0
-
Creative Labs Multimedia upgrade kit with SB Pro 1.0
For both of these editions, it is best to use sbtype=sbpro1 in your DOSBox-X config file.
During Windows installation, the Tandy edition will only offer the option to change the base IO port from the default 220.
Options to change the IRQ and DMA are not given. For this edition, you should either set irq=10 and dma=3 in your DOSBox-X config file, or modify the defaults manually after installation in C:\MWINDOWS\SYSTEM.INI
For the Creative Labs edition, it will ask for the base IO port, IRQ and DMA during installation. Unless you changed the settings in your DOSBox-X config file, the default is IO 220, IRQ 7 and DMA 1.
|
Note
|
Setting the wrong SB settings can cause Windows to crash when it tries to play sounds, which it will do by default on Windows startup. |
Enabling external MIDI in Windows 3.0 Multimedia Edition
By default, the SBPro Windows drivers will emulate MIDI playback using the dual OPL2 chips.
However, DOSBox-X has built-in support for General MIDI emulation (which is normally enabled by default), and which sounds much better.
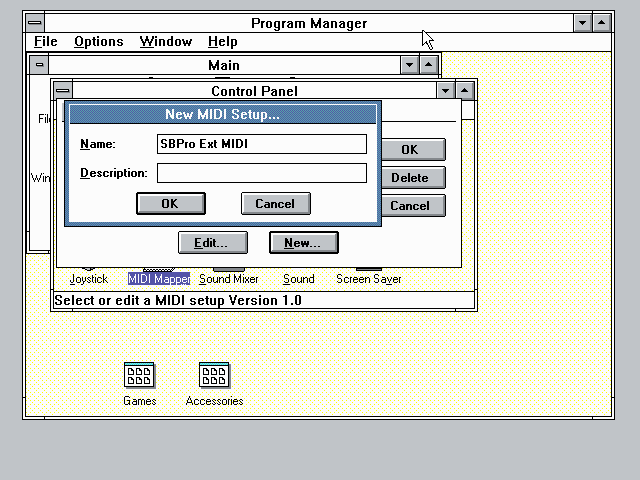
To set it up, in Windows 3.0 Multimedia Edition, go to "Control Panel" and open "MIDI Mapper".
In the "MIDI Mapper" dialogue box click on the "New…" button. You will be asked for a name and description. You can name it anything you like, for instance "SBPro Ext MIDI", and click the "OK" button. You do not have to enter anything for the Description.
You will then get a "MIDI Setup" window. The only thing you want to change here is the "Port Name" to "SB MIDI Out" for all 16 lines. You may also notice that for each line the active checkbox gets checked, this is correct. Once finished click the "OK" button and confirm the save.
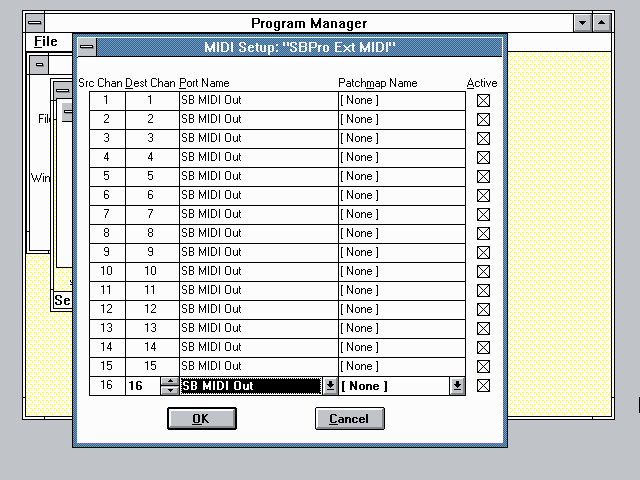
You should now be able to open the Windows 3.0 Media Player and playback something like C:\MWINDOWS\MMDATA\CANYON.MID.
Enabling printing
Also see the Guide: Setting up printing in DOSBox-X
Print to PostScript
For the best print quality, you will want to print to a PostScript printer in Windows 3.0.
First, set up your DOSBox-X config to print to a file as such:
[dosbox]
captures=capture

[parallel]
parallel1=file timeout=2000
Next in Windows 3.0, select any PostScript printer such as the "QMS ColorScript 100", during printer setup connected to LPT1.
When you print, a .prt file in your captures= directory will be created, which despite the extension, is actually a PostScript file.
On Linux and macOS, PostScript files are natively supported and can be viewed and printed. On a Windows host, it is necessary to install a separate PostScript viewer such as GSview.
Epson emulation
As an alternative, you can use the integrated Epson printer emulation, but the output quality will be significantly less compared to PostScript.
First, set up your DOSBox-X config to emulate an Epson printer as such:
[parallel]
parallel1=printer
[printer]
printer=true
printoutput=ps
multipage=true
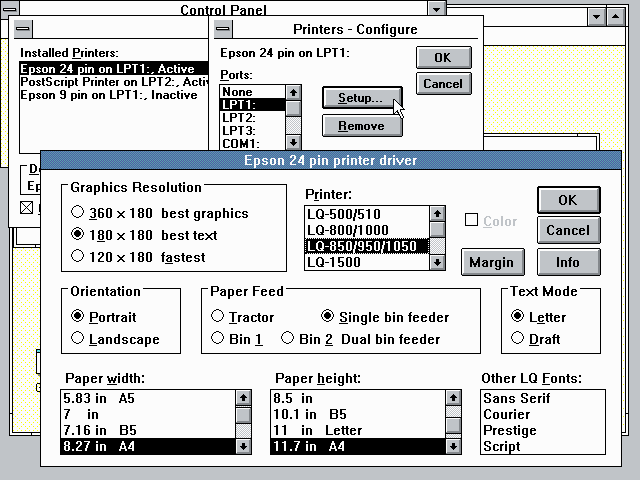
timeout=2000Next in Windows 3.0, select the "Epson LQ-850/950/1050" option, connected to LPT1.
|
Warning
|
Make sure that you do not configure the Epson printer driver for a graphics resolution other than 180x180, or the output will be corrupted. |
When you print, a PostScript file with the .ps extension will be created in your current working directory. The emulated Epson printer settings can be adjusted as documented on the above linked wiki printing guide.
Starting a Windows game from DOS
If you want to silently start a Windows game, without seeing the Windows 3.0 splash screen or program manager, and when you exit the game that it exits Windows, here are the steps to take:
First install the game normally in Windows.
You can then start the game from DOS simply by appending the Windows game executable behind the WIN.COM executable as such:
WIN \path\to\game.exeThis will prevent the Windows splash screen being shown and will directly start the game without first going to the Program Manager (progman).
The second step you may want to take, is that when you exit the game, you also exit Windows 3.0. For this you need a 3rd party utility called "RUNEXIT.EXE", and place it in your PATH. Now simply start the game as follows:
WIN RUNEXIT \path\to\game.exeLike before it will start the game without the Windows splash screen, but now when you Exit the game it will also Exit Windows. This way you can launch Windows games from a DOS batch file, or from a DOSBox launcher such as DBGL.
Known limitations
-
When booting a guest OS, such an MS-DOS with Windows 3.0 in DOSBox-X, so-called folder mounts are only partly supported. Only harddisk folder mounts will be available to the guest OS, and this excludes the boot drive as DOSBox-X cannot boot from a folder mount.
-
If you intend at any point to use a diskette during your usage of Windows 3.0, you must mount a diskette image before starting Windows 3.0. You can change the diskette, once you started Windows 3.0 from the DOSBox-X menus. But if a diskette drive is not present when starting Windows 3.0, and you attach it afterwards, it will not work properly, and you get strange errors.
-
If you intend at any point to use a CD during your usage of Windows 3.0, you must mount a CD image before starting Windows 3.0. You can change the CD, once you started Windows 3.0 from the DOSBox-X menus. But if a CD-ROM drive is not present when starting Windows 3.0 the drive is simply missing, and you cannot add it without quitting and restarting Windows 3.0.