Back to the Microsoft Windows in DOSBox-X
Installing Microsoft Windows 3.1x in DOSBox-X
- Installing Microsoft Windows 3.1x in DOSBox-X
- Overview
- DOSBox-X config file
- Preparing for installation
- Installing in a mounted folder
- Booting from a DOS HDD image
- Starting Windows 3.1x after installation
- Steps to take after installation
- Video driver
- Mouse support
- DOSBox-X mouse integration driver
- Enabling 32-bit File and Disk access
- Enabling networking
- Sound
- Enabling printing
- Installing Win32s
- Starting a Windows game from DOS
- Known limitations
- Outstanding issues
Overview
This guide will give a general description of installing Windows 3.1x in DOSBox-X, in addition to addressing some common issues.
Editions this applies to
-
Windows 3.1 (released Apr 6, 1992)
-
Supports up to 256MB RAM.
-
Dropped support for real mode (8086/8088 CPUs).
-
Includes updated Multimedia Extensions.
-
Adds TrueType font support.
-
Adds optional 32-bit disk access (386 Enhanced Mode only).
-
Adds the Windows Registry.
-
-
Windows 3.11 (released Nov 8, 1993)
-
Bug fix release.
-
-
Windows for Workgroups 3.1 (released Oct, 1992)
-
Adds SMB file sharing (NBF or IPX protocols only).
-
Adds VSHARE.386.
-
-
Windows for Workgroups 3.11 (released Nov 8, 1993)
-
Adds 32-bit file redirectors.
-
Drops support for standard mode (286 CPUs).
-
-
Windows for Workgroups 3.11a
-
Removed compression support from Remote Access software
-
-
Windows 3.2 (released Nov 22, 1993)
-
Chinese language release of Windows 3.1.
-
| Edition | Min CPU | Min RAM | Max RAM | Min HDD space | Min DOS |
|---|---|---|---|---|---|
3.1 |
286 |
2MB |
256MB |
8MB |
3.1 |
3.11 |
286 |
2MB |
256MB |
8MB |
3.1 |
3.1 WfW |
386 |
3MB |
256MB |
14MB |
3.3 |
3.11 WfW |
386 |
3MB |
256MB |
14MB |
3.3 |
Windows 3.1x was available in both Retail and OEM editions.
OEM editions may include and default to different drivers in SETUP for things like video and sound.
README.1ST
There are already some guides to installing Windows 3.1x in DOSBox, and those guides will also work with DOSBox-X. Some examples:
-
Windows 3.1x DOSBox Guide on Vogons by user Dominus
-
How to Install Windows 3.1 in DOSBox, Set Up Drivers, and Play 16-bit Games on How-To Geek
-
Windows 3x on DOSBox guide on sierrahelp.com
This guide does not look to replicate those guides. Instead, this guide will have some install guidance and hints and tips not covered on those pages, or that are specific to DOSBox-X. It is not intended to be a comprehensive guide.
Useful links
General Notes
-
Some parts of the installation can take a considerable amount of time. You may be able to speed this up considerably (depending on the host CPU) by using the DOSBox-X Turbo mode, which can be enabled from the drop-down menu bar by selecting "CPU" followed by "Turbo (Fast Forward)". This turbo mode is not like the old Turbo button on retro PCs, but functions more like a fast-forward, and therefore should not be used when interacting with the guest OS. The turbo mode is automatically disabled the moment a key is pressed, to prevent spurious keypresses to be registered causing undesirable effects.
DOSBox-X config file
It is recommended that you create a custom DOSBox-X config file for running Windows 3.1x
[sdl]
autolock=true

[dosbox]
title=Windows 3.1x
memsize=256

[dos]
hard drive data rate limit=0
floppy drive data rate limit=0

[cpu]
cputype=pentium
core=normal

[pci]
voodoo=false

[ide, primary]
int13fakeio=true
int13fakev86io=false

[render]
scaler=none

[autoexec]
Copy the above config and save it as win31.conf
Preparing for installation
Practically all Windows 3.1x versions were shipped on floppies, requiring anywhere between 5 and 15 disks, depending on media-type and Windows version. And while it is possible to install Windows 3.1x from floppy images in DOSBox-X, the disk-swap process for this is rather tedious for substantial number of disks. As such it is recommended to make a directory such as "INSTALL" and copy the contents of ALL the diskettes into this directory. This way there is no need to swap disks during the installation process.
Example of extracting files from disk images
There are several ways to extract the contents of disk images, such as 7zip on Windows or "Disk Image Mounter" on Linux. In this example, DOSBox-X itself is used to mount a disk image, copy its contents into a folder, unmount the disk image and do the next.
MOUNT C /home/myuser/winroot
C:
MD INSTALL
IMGMOUNT A DISK01.IMG -U
COPY A:\*.* C:\INSTALL
IMGMOUNT A DISK02.IMG -U
COPY A:\*.* C:\INSTALL
IMGMOUNT A DISK03.IMG -U
COPY A:\*.* C:\INSTALL
IMGMOUNT A DISK04.IMG -U
COPY A:\*.* C:\INSTALL
IMGMOUNT A DISK05.IMG -U
COPY A:\*.* C:\INSTALL
IMGMOUNT A -U
Your new INSTALL directory now holds the contents of all 5 disks in this example.
Installing in a mounted folder
|
Note
|
This method is the easiest, but has a limitation in that it will not allow for 32-bit disk IO with Windows 3.1x. However, no software needs this, and it does not provide a real performance benefit in DOSBox-X. |
Create a directory on your system that you’re going to use (mount) as your Windows 3.1x C: drive. Valid examples:
-
For Windows hosts
-
C:\winroot
-
C:\users\myuser\win31
-
-
For Linux hosts
-
/home/myuser/winroot
-
/home/myuser/windows/win311
-
|
Note
|
For users running Windows natively on their computer, do NOT mount the root of your C: drive as the DOSBox C: drive! (e.g., MOUNT C: C:\ should NOT be done), as it will cause confusion and potential conflicts between the host system C:\WINDOWS directory and that of Windows 3.1x.
|
Now create a directory underneath that, which will hold your Windows 3.1x installation files.
e.g., C:\users\myuser\win31\INSTALL or /home/myuser/winroot/INSTALL and copy the installation files into it.
You are now ready to start DOSBox-X from the command-line, using the newly created win31.conf.
This assumes that the dosbox-x program is in your path and win31.conf is in your current directory.
dosbox-x -conf win31.confYou now need to mount your new folder as the C: drive in DOSBox-X and start the installation.
MOUNT C /home/myuser/winroot
C:
CD INSTALL
SETUP
Adjust the path for mounting the C: drive as needed.
|
Note
|
If your path has spaces in it, you need to enclose it in quotes. e.g., MOUNT C "C:\Users\John Doe\winroot"
|
The Windows installation will now take place.
Once the installation process has finished, you will be asked if you want to start windows or exit to DOS. Exit to DOS and type EXIT to close DOSBox-X.
Now edit your win31.conf config file and add the following lines into the [autoexec] section at the end of the file.
@ECHO OFF
MOUNT C /home/myuser/winroot
C:
IF EXIST C:\WINDOWS\IFSHLP.SYS GOTO WFW
IF EXIST C:\WINDOWS\WIN.COM GOTO WINDOWS
ECHO No Windows installation found
GOTO END

:WFW
echo Starting Windows for Workgroups 3.1x
SET PATH=%PATH%;C:\WINDOWS;
SET TEMP=C:\WINDOWS\TEMP
DEVICE C:\WINDOWS\IFSHLP.SYS
C:\WINDOWS\NET.EXE START
C:\WINDOWS\WIN.COM
GOTO END

:WINDOWS
echo Starting Windows 3.1x
SET PATH=%PATH%;C:\WINDOWS;
SET TEMP=C:\WINDOWS\TEMP
C:\WINDOWS\WIN.COM
GOTO END

:END
EXIT
Adjust the MOUNT path above for mounting the C: drive as needed.
Booting from a DOS HDD image
This method brings with it a bit of added inconvenience. For instance, you will need to do your own DOS memory management and load DOS drivers for CD-ROM access. You can also not boot DOSBox-X from a mounted host directory (folder mount).
Host Folder mounts
Starting with DOSBox-X 2022.08.0, there is optional support to dynamically convert a host folder mount to an emulated FAT harddisk for use when you need to boot a guest OS, such as MS-DOS.
This can be accomplished in one of two ways. Either when you issue the boot command, you add the option -convertfat. e.g. boot c: -convertfat.
Or by setting the following option in your DOSBox-X config file:
[sdl]
convertdrivefat = true
When you now boot from a real image file, it will attempt to convert ALL folder mounts at the time of booting to emulated FAT Harddisks.
|
Note
|
You cannot boot from such an emulated FAT harddisk. You will still need some other bootable image file to actually boot a guest OS. |
|
Note
|
This conversion is dynamic, effectively creating an emulated FAT harddisk out of a folder mount.
This converted FAT harddisk is not automatically stored permanently.
You can however, store it as a permanent image file that you can later mount with IMGMOUNT, using the "Drive" > "drive letter" > "Save to disk image" option from the menus.
Please see the "Creating harddisk images from folder mounts" section in the Guide: Managing image files in DOSBox-X for more information.
|
|
Note
|
There is currently no support for creating emulated CD-ROM or Floppy drives out of folder mounts with this method. Any CD-ROM or Floppy folder mounts will also be converted to harddisk folder mounts, and may not actually work for the intended purpose. |
One thing to note, is that there is no way to specify the FAT type to use for the conversion.
The FAT type will be automatically selected based on the aggregate size of files in the folder, plus 250MiB (this can be adjusted with the convert fat free space option in the DOSBox-X config file).
If the total space of files + 250MiB does not exceed 2GiB, it will convert it into a FAT16 disk. Otherwise, it will become a FAT32, which in turn will require a guest OS with FAT32 support.
Alternatively, you can also make the emulated FAT drive read-only by using the -convertfatro option with the boot command. Or by setting convert fat free space=0 option in the DOSBox-X config file.
Installing Windows 3.1x into a DOS HDD image
The first step is to create a DOS HDD image, for which you can follow the PC DOS and MS-DOS Installation Guide. You need at least DOS 3.1 for Windows 3.1x, and DOS 3.3 for Windows for Workgroups. However, it is recommended to use a newer version such as DOS 6.x
Once you have a DOS HDD image, temporarily mount it in DOSBox-X to transfer your INSTALL folder into your DOS HDD image, together with any drivers and add-ons you might need (preferably already unzipped, such that you don’t need to do that in DOS or Windows 3.1x, as they lack support for that by default).
Something like:
IMGMOUNT C hdd.img
MOUNT D .
XCOPY D:\INSTALL C:\INSTALL /I /S
XCOPY D:\DRIVERS C:\DRIVERS /I /S
XCOPY D:\ADDONS C:\ADDONS /I /S
EXIT
Adjust paths in the above example as needed.
Now edit your win31.conf config file and in the [autoexec] section at the end, add the following lines:
IMGMOUNT C hdd.img -reservecyl 1
BOOT C:
Now start DOSBox-X with your win31.conf config file from the command-line:
dosbox-x -conf win31.confIt should boot to the C: prompt, and you can start the installation process.
CD INSTALL
SETUP
After the installation is finished, you can install your drivers and add-ons.
Starting Windows 3.1x after installation
After the installation is finished, you can start Windows 3.1x from the command-prompt with the following command:
dosbox-x -conf win31.confYou can optionally create a shortcut on your desktop to start Windows 3.1x directly.
Steps to take after installation
Once Windows 3.1x is installed, here is some additional software you may want to install or update:
Video driver
See Video card support in DOSBox‐X for more information about the various video cards, and available options.
|
Note
|
The generic "Super VGA" driver included with Windows 3.1x only works under DOSBox-X with machine=svga_et4000.
Regardless, It is recommended to use the default VGA video driver during Windows 3.1x installation, and install a 3rd party SVGA driver afterwards.
|
|
Note
|
If you intend to use Video for Windows (VFW), first install VFW and then the updated S3 video driver. Alternatively, reinstall the S3 video driver after installing VFW. Failing to do so may result in VFW playback giving a green window. |
For installing a 3rd party display driver, you should follow the instructions (e.g. README) included with the driver.
If there are no instructions included, exit Windows 3.1x back to the DOSBox-X prompt, then go into the WINDOWS subdirectory, and run SETUP. e.g.,
cd \WINDOWS
SETUP
Select the "Display" option, followed by the "Other" option at the bottom of the list.
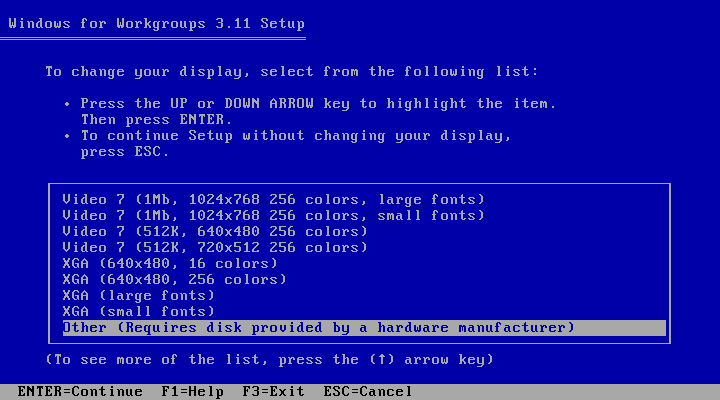
Now provide the path where the unpacked driver can be found, and continue and the driver should install.
Here are the recommended drivers, depending on the video adapter you are emulating.
|
Tip
|
For Windows 3.1x the recommended display adapter is the default S3 Trio64. |
-
S3 Graphics
-
S3 86c928 using
machine=svga_s386c928 -
S3 Vision864 using
machine=svga_s3vision864 -
S3 Vision868 using
machine=svga_s3vision868 -
S3 Vision964 using
machine=svga_s3vision964 -
S3 Vision968 using
machine=svga_s3vision968 -
S3 Trio32 using
machine=svga_s3trio32 -
S3 Trio64 (default) using
machine=svga_s3ormachine=svga_s3trio64 -
S3 Trio64V+ using
machine=svga_s3trio64v+ -
S3 ViRGE using
machine=svga_s3virge(experimental) -
S3 ViRGE/VX using
machine=svga_s3virgevx(experimental)
-
-
Tseng Labs
-
ET3000 using
machine=svga_et3000 -
ET4000 using
machine=svga_et4000
-
-
Paradise Systems
-
PVGA1A using
machine=svga_paradise-
There does not appear to be a Windows 3.1x specific driver, use the Windows 3.0 driver instead.
-
-
|
Note
|
The above video drivers are so-called "flat mode" drivers, which only work in Windows 3.1x Enhanced Mode (386 and above). If for some reason you want to run Windows 3.1x standard mode (e.g. on a 286), use the Windows 3.0 drivers instead. |
Mouse support
When running Windows in DOSBox-X the integration is not seamless. You need to capture the mouse and again release it when you want the mouse to leave the DOSBox-X window. This is because Windows uses its own driver instead of using the integrated mouse support that DOSBox-X provides.
There are three possible solutions to this.
DOSBox-X mouse integration driver
There is experimental support in DOSBox-X for seamless integration. To get this working take the following steps:
Go to doslib releases and download the latest binary release of doslib.
Unpack the archive, and you will find a Windows 3.1x mouse driver in the windrv/dosboxpi/bin/win31 directory.
-
Copy the
DBOXMPI.DRVandOEMSETUP.INFfiles for your Windows version to a place where the Windows SETUP.EXE program will be able to find it -
When you run SETUP.EXE, select to change the mouse and then select the "Other (requires disk provided by a hardware manufacturer)" option
-
Enter the path where you saved the
DBOXMPI.DRVandOEMSETUP.INFfiles -
Select the "DOSBox-X Mouse Pointer Integration" option
-
If SETUP asks for the "DOSBox-X Guest Additions" disk, give it the same path as before.
-
Continue the setup as normal
In addition, set the following options in your DOSBox-X config file:
[sdl]
mouse emulation=integration

[cpu]
integration device=true
Now when you run Windows 3.1x, you should have seamless mouse support.
|
Note
|
These old windows versions had no support for mice with scroll wheels. By default, DOSBox-X will simulate cursor up/down keypresses when you use the scroll wheel.
This can be controlled by the mouse_wheel_key= setting in the [sdl] section of your DOSBox-X config file.
|
VMWare mouse driver - option #1
DOSBox-X also supports the VMware mouse protocol, and there is a 3rd party VMware mouse driver for Windows 3.x written by NattyNarwhal. As such you can install the VMware mouse driver for Windows 3.1x, and you will be able to move the mouse in and out of DOSBox-X seamlessly.
Simply run the DOS based SETUP.EXE program for Windows 3.1x and select "Mouse" followed by "Other". Then type the location where you saved the unpacked VMware mouse driver for Windows 3.1x.
VMWare mouse driver - option #2
Another option is the Windows 3.1x mouse driver VBMOUSE.DRV by @javispedro, including support for the scroll wheel.
If you are running Windows 3.1x directly in the DOSBox-X integrated DOS environment, do not load the VBMOUSE.EXE driver. Only install the VBMOUSE.DRV in Windows 3.1x.
For scroll wheel support, you will also have to set the following setting in your DOSBox-X config file:
[sdl]
mouse_wheel_key=0
Enabling 32-bit File and Disk access
-
Introduced with Windows 3.1, 32-Bit Disk Access allows Windows to bypass the 16-Bit BIOS.
-
Introduced with Windows 3.11, 32-Bit File Access allows Windows to bypass the 16-Bit DOS FAT code.
Enabling these features' means that Windows must leave 32-bit protected mode less often, and should therefore, at least in theory, be faster. However, based on benchmarks, there is no advantage at this time to enabling these features in DOSBox-X, and it may reduce performance!
32-Bit Disk Access (also called FastDisk) uses the WDCTRL driver built into WIN386.EXE that is included with Windows 3.1x, which should work in DOSBox-X if the following conditions are met:
-
You must use a real DOS in DOSBox-X.
-
Your HDD image must have 1023 cylinders or fewer (max 504MB).
-
When creating you harddisk image in DOSBox-X you may want to use
IMGMAKE hdd.img -t hd_520, which will give you exactly a 504MB HDD.
-
-
You can only have one HDD.
-
You cannot have a CD-ROM as a slave on the same IDE controller as the HDD.
-
You must have set
int13fakeio=trueandint13fakev86io=falsein your DOSBox-X config file. -
You must mount your HDD image file with
-reservecyl 1. -
You must mount your HDD image file with device number 2, and not the drive letter (this is likely a bug in DOSBox-X).
-
You must edit
C:\WINDOWS\SYSTEM.INIand in the[386enh]section add the following 2 lines (preferably between the*pageswapand*biosxlatdrivers):-
device=*int13 -
device=*wdctrl
-
-
In the same file, at the bottom of the
[386enh]section add the line:-
32BitDiskAccess=ON
-
See How to please WDCTRL for more background information.
32-Bit File Access has no such requirements and can be enabled seemingly on any system.
To enable these features, open the "Main" folder, followed by "Control Panel". Now double-click on the "386" chip icon titled "Enhanced". Then click on the "Virtual Memory…" button. Under Disk Status you can see what access methods Windows is currently using. Now click on the "Change>>" button. At the bottom there are options for "Use 32-Bit Disk Access" and "Use 32-Bit File Access". If the 32-Bit Disk Access option is greyed out, it probably means your configuration is not compatible with the option.
There are 3rd party 32-Bit Disk Access drivers which may allow it to function on larger disks, but have not been tested in combination with DOSBox-X.
Most 3rd party drivers only work in combination with specific hardware. The Ontrack ontrackw.386 driver does work in DOSBox-X but seems to have similar restrictions.
Enabling networking
To enable networking, you first need to enable NE2000 network adapter emulation in your win31.conf config file and select an appropriate back-end for the NE2000 emulation.
Enabling NE2000 in your DOSBox-X config file
There are two different back-ends to the NE2000 adapter emulation.
The default back-end is backend=pcap.
backend=pcap
The PCAP back-end uses something called "Promiscuous mode". This has the advantage that DOSBox-X can support various legacy network protocols, such as IPX and NetBIOS Frames (aka NetBEUI) in addition to TCP/IP. This mode not only allows communication between DOSBox-X instances on the same network, but also with legacy PCs on the same network.
However, for this to work DOSBox-X needs to have very low-level access to your real network adapter. In some cases, this is not possible, such as:
-
Network Adapter or Driver not supporting Promiscuous mode (most wireless adapters fall into this category).
-
Your Ethernet switch not allowing multiple MAC addresses on a single port or doing any kind of MAC address whitelisting.
-
Sandboxed versions of DOSBox-X (e.g., Flatpak) not allowing the required low-level access.
To enable NE2000 emulation with the pcap back-end, add the following to your win31.conf config file:
[ne2000]
ne2000=true
nicirq=10
backend=pcap

[ethernet, pcap]
realnic=list
The list value for realnic= will need to be replaced by a value representing your actual network adapter.
See Guide: Setting up networking in DOSBox-X for more information.
backend=slirp
Unlike the PCAP back-end, the SLIRP back-end does not require Promiscuous mode. As such it will work with wireless adapters, and it will work in most sandboxed environments.
But obviously, it has its own limitations.
-
It is not supported in all platforms, such as Windows Visual Studio builds.
-
It only supports the TCP/IP protocol (other protocols must be TCP/IP encapsulated).
-
It is effectively behind a NAT (Network Address Translation) gateway, meaning that you can communicate outbound, but no systems on the LAN can instantiate a new connection to it. Which means that two DOSBox-X instances on the same LAN using
backend=slirpcannot communicate with each other.
To enable NE2000 emulation with the slirp back-end, add the following to your win31.conf config file:
[ne2000]
ne2000=true
nicirq=10
backend=slirp
Setting up NE2000 networking in Windows for Workgroups
This only applies to Windows for Workgroups (WfW).
If you install WfW inside DOSBox-X with networking support, you need to run DEVICE C:\WINDOWS\IFSHLP.SYS and C:\WINDOWS\NET START before starting Windows if run from DOSBox-X’s internal DOS.
Windows for Workgroups by default only supports SMB networking over NBF (NetBIOS Frames aka NetBEUI) or IPX. There is no support by default for the TCP/IP protocol.
You can however install Microsoft TCP/IP-32, which was sold separately, to add TCP/IP support to WfW.
|
Note
|
There were many other 3rd party network stacks. See A happy hookup: TCP/IP joins Unix to PCs and Comparing TCP/IP products for PCs for an overview of TCP/IP stacks for both Windows 3.1 and WfW3.11. These have not been tested, and may or may-not work. |
Sound
Starting with Windows 3.1, multimedia support is standard.
DOSBox-X by default emulates a Creative Labs Sound Blaster 16. Download and install the SB16 driver package. The installer needs to be run from DOS.
Pay close attention during installation to the IRQ. The emulated SB16 in DOSBox-X defaults to IRQ7, while the SB16 driver package assumes IRQ5. So, unless you changed the SB IRQ in your DOSBox-X config file, change the IRQ during installation to IRQ7.
Enabling external MIDI
By default, the SB16 Windows 3.1x drivers will emulate MIDI playback using the OPL3 chip. However, DOSBox-X has built-in support for General MIDI emulation (which is enabled by default), and which sounds much better.
To set it up, first ensure the SB16 drivers are installed. Then in Windows 3.1x go to "Control Panel" and open "MIDI Mapper".
In Windows 3.1x go to "Control Panel", and open "MIDI Mapper. If there is no "MIDI Mapper" icon in "Control Panel", the Sound Blaster drivers were not installed. Select the "SB16 All MIDI" option from the drop-down menu and press the "Close" button.
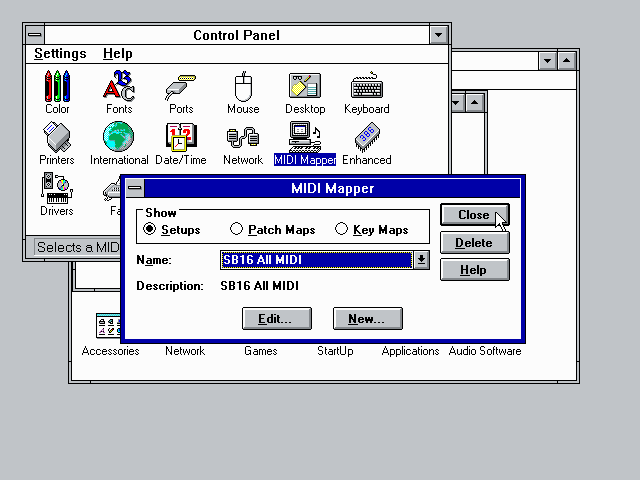
You should now be able to open the Windows 3.1x Media Player and playback something like C:\WINDOWS\CANYON.MID.
Enabling printing
Also see the Guide: Setting up printing in DOSBox-X
Print to PostScript
For the best print quality, you will want to print to a PostScript printer in Windows 3.1x.
First, set up your DOSBox-X config to print to a file as such:
[dosbox]
captures=capture

[parallel]
parallel1=file timeout=2000
You can either use the PostScript driver bundled with Windows 3.1x, or alternatively install the newer Adobe PostScript 3.1.2 driver.
If using the bundled driver, select any PostScript printer such as the "QMS ColorScript 100", during printer setup connected to LPT1.
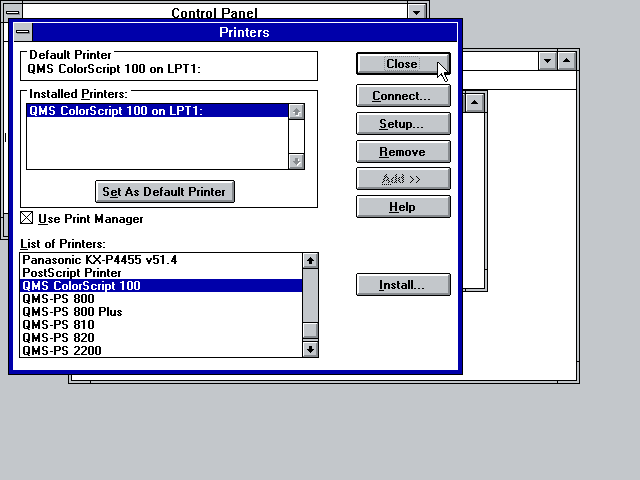
When you print, a .prt file in your captures= directory will be created, which despite the extension, is actually a PostScript file.
On Linux and macOS, PostScript files are natively supported and can be viewed and printed. On a Windows host, it is necessary to install a separate PostScript viewer such as GSview.
Epson emulation
As an alternative, you can use the integrated Epson printer emulation, but the output quality will be significantly less compared to PostScript.
First, set up your DOSBox-X config to emulate an Epson printer as such:
[parallel]
parallel1=printer
[printer]
printer=true
printoutput=ps
multipage=true
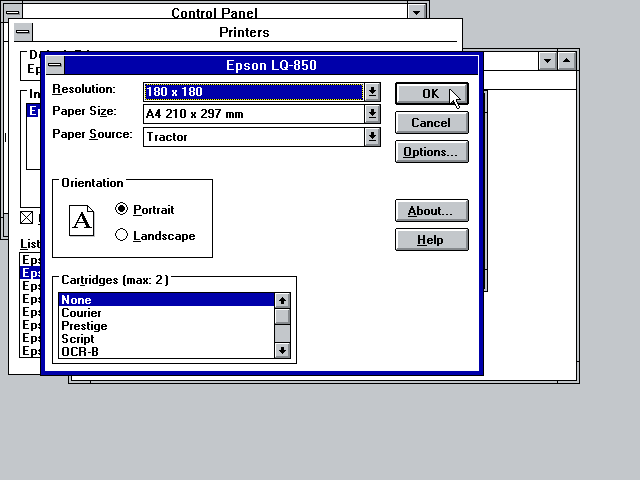
timeout=2000Next in Windows 3.1x, select any Epson dot-matrix printer during printer setup, such as:
-
For Windows 3.1, the "Epson LQ-850" (or "LQ-1050" for wide formats), connected to LPT1
-
For Windows 3.11, the "Epson LQ-860" (or "LQ-1050" for wide formats), connected to LPT1
|
Warning
|
Make sure that you do not configure the Epson printer driver for a graphics resolution other than 180x180, or the output will be corrupted. |
When you print, a PostScript file with the .ps extension will be created in your current working directory. The emulated Epson printer settings can be adjusted as documented on the above linked wiki printing guide.
Installing Win32s
Win32s is a 32-bit application runtime environment for Windows 3.1x. Some games and applications require it. Win32s version 1.30c is the latest version.
It installs and runs without problems in DOSBox-X. But be aware, that unless your running Windows 3.1x under real DOS, then DOSBox-X’s integrated SHARE feature will be enabled by default which emulates most of the DOS SHARE.EXE functions. Win32s requires that SHARE.EXE is loaded, so your options are either to use the SHARE functions as implemented by DOSBox-X or install Windows 3.1x in real DOS in DOSBox-X.
|
Warning
|
While DOSBox-X’s integrated SHARE feature was improved compared to that of vanilla DOSBox, it may not fully implement all of DOS SHARE.EXE functions, and as such may not be 100% safe for some applications. |
Starting a Windows game from DOS
If you want to silently start a Windows game, without seeing the Windows 3.1x splash screen or program manager, and when you exit the game that it exits Windows, here are the steps to take:
First install the game normally in Windows.
You can then start the game from DOS simply by appending the Windows game executable behind the WIN.COM executable as such:
WIN \path\to\game.exeThis will prevent the Windows splash screen being shown and will directly start the game without first going to the Program Manager (progman).
The second step you may want to take, is that when you exit the game, you also exit Windows 3.1x. For this you need a 3rd party utility called "RUNEXIT.EXE", and place it in your PATH. Now simply start the game as follows:
WIN RUNEXIT \path\to\game.exeLike before it will start the game without the Windows splash screen, but now when you Exit the game it will also Exit Windows. This way you can launch Windows games from a DOS batch file, or from a DOSBox launcher such as DBGL.
Known limitations
-
When booting a guest OS, such an MS-DOS with Windows 3.1x in DOSBox-X, so-called folder mounts are only partly supported. Only harddisk folder mounts will be available to the guest OS, and this excludes the boot drive as DOSBox-X cannot boot from a folder mount.
-
If you intend at any point to use a diskette during your usage of Windows 3.1x, you must mount a diskette image before starting Windows 3.1x. You can change the diskette, once you started Windows 3.1x from the DOSBox-X menus. But if a diskette drive is not present when starting Windows 3.1x, and you attach it afterwards, it will not work properly, and you get strange errors.
-
If you intend at any point to use a CD during your usage of Windows 3.1x, you must mount a CD image before starting Windows 3.1x. You can change the CD, once you started Windows 3.1x from the DOSBox-X menus. But if a CD-ROM drive is not present when starting Windows 3.1x the drive is simply missing, and you cannot add it without quitting and restarting Windows 3.1x.
Outstanding issues
-
Using 32Bit Disk and File lowers performance.
-
32Bit Disk and File, requires mounting the HDD image using drive number.